이름은 생소하지만 알게모르게 사용하고있던 패턴 '템플릿 메소드 패턴'입니다!

템플릿 메소드 패턴 정의
어떤 작업 알고리즘의 골격을 정의합니다. 일부 단계는 서브클래스에서 구현하도록 할 수 있습니다. 템플릿 메소드를 이용하면 알고리즘의 구조는 그대로 유지하면서 특정 단계만 서브클래스에서 새로 정의하도록 할 수 있습니다.
적용되는 객체지향의 원칙
수퍼클래스에서 모든것을 관리하고 필요한 서브클래스를 불러서 써야합니다.
템플릿 메소드 패턴의 핵심
재활용성을 생각하면서!(밑줄쫙)
추상클래스를 사용해서 수퍼클래스에 중복되는 부분은 구현하고,
서브 클래스에 달라질 수 있는 부분(바뀌는 부분)을 구현해줍니다.
* 수퍼클래스에서 알고리즘을 관리하는 템플릿 메소드가 하나 있어야 합니다.
* 템플릿 메소드는 알고리즘만 관리하기때문에 변화가 없어야하며 수퍼클래스에 존재해야 합니다.
https://welcomeheesuk.tistory.com/72
[디자인패턴] 8. 유니티에서의 커맨드 패턴
꿀같은 추석시즌동안 너무 행복하게 쉬었답니다. 추석이 전부 가버리기 전에 지난주에 공부했던 커맨드 패턴에 대해 정리해보겠습니다. 커맨드 패턴 핵심 요청하는 객체와 요청을 수행하는 객
welcomeheesuk.tistory.com
지난 시간 '커맨드 패턴' 시간에서 사용했던 Actor를 재활용해보겠습니다.
수퍼클래스이자, 추상클래스인 Actor입니다~
* 이번에 수정하면서 actor, 즉 수퍼 클래스에 추가된 부분이 있는데 바로 템플릿 메소드입니다.
* 모든 서브 클래스에서 구현될 추상메소드들을 관리, 알고리즘을 관리하는 템플릿 메소드 PlayActions()가 되겠습니다.
* 해당 탬플릿 메소드는 변동이 없어야하며 수퍼클래스에 존재하여야 합니다.
using System.Collections;
using System.Collections.Generic;
using UnityEngine;
using UnityEngine.UI;

// 움직이는 대상이 공통적으로 가지고있는 요소 제어
public abstract class Actor : MonoBehaviour
{
    [SerializeField]
    protected Text nameText = null;
    [SerializeField]
    protected Text actionText = null;

    [SerializeField]
    protected SpriteRenderer spriteRenderer = null;
    private Collider2D bodyCollider = null;
    private Rigidbody2D bodyRigid = null;

    public float jumpSpeed = 100f;
    public float moveSpeed = 0.1f;

    private List<System.Action> actions = new List<System.Action>();
    private void Awake()
    {
        this.bodyRigid = this.GetComponent<Rigidbody2D>();
        this.bodyCollider = this.GetComponent<Collider2D>();

        this.actions.Add(this.Idle);
        this.actions.Add(this.MoveLeft);
        this.actions.Add(this.MoveRight);
        this.actions.Add(this.Jump);
        this.actions.Add(this.Attack);
        this.actions.Add(this.PowerAttack);

        // 플레이어 초기화
        this.Idle();
        // 동작 실행
        this.StopAllCoroutines();
        this.StartCoroutine(this.PlayActions());
    }
    public Collider2D GetCollider()
    {
        return this.bodyCollider;
    }
    public Rigidbody2D GetRigid()
    {
        return this.bodyRigid;
    }

    // 구현된 서브클래스를 실행하는 템플릿 메소드
    // 탬플릿 메소드를 사용하기위해 자동으로 움직이는 NPC처럼 만들었습니다.
    private IEnumerator PlayActions()
    {
        while (true)
        {
            yield return new WaitForSeconds(1f);
            // 1초마다 랜덤한 행동 호출
            int randomIndex = Random.Range(0, this.actions.Count);
            this.actions[randomIndex]();
        }
    }

    // 변동의 요소가 있는 함수는 확장성을 가지도록 서브 클래스에서 구현
    public abstract void Idle();
    public abstract void MoveLeft();
    public abstract void MoveRight();
    public abstract void Jump();
    public abstract void Attack();
    public abstract void PowerAttack();
}
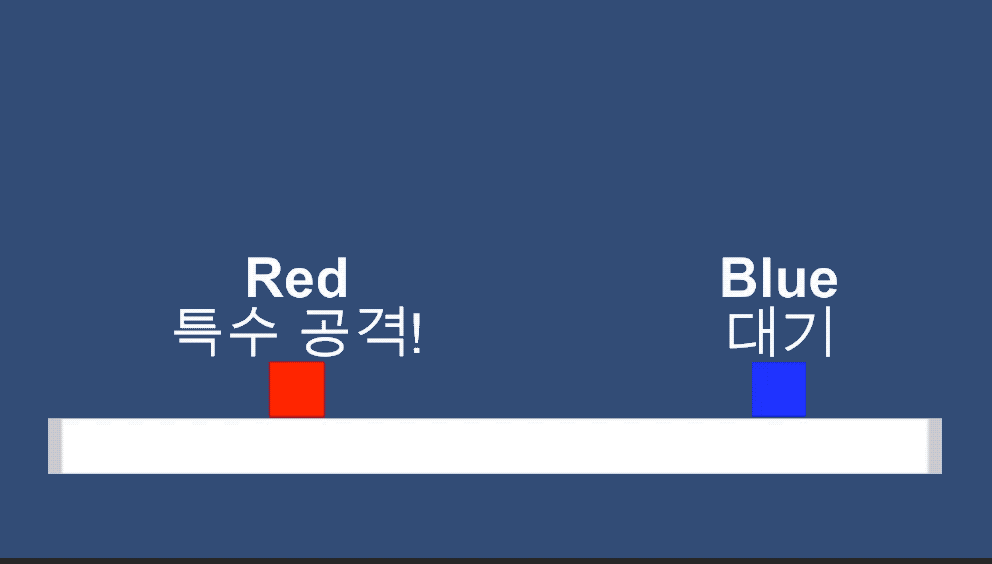
다음은 Actor를 상속받는 서브클래스 RedPlayer와 BluePlayer입니다. (각각 다르게 가져야하는 부분을 유심히 봅시다!)
// 빨간팀 플레이어
public class RedPlayer : Actor
{
    private Color originColor = Color.red;

    public override void Idle()
    {
        this.nameText.text = "Red";
        this.actionText.text = "대기";
        this.spriteRenderer.color = this.originColor;
    }

    public override void MoveLeft()
    {
        this.actionText.text = "왼쪽 이동";
        this.GetRigid().AddForce(Vector2.left * this.moveSpeed, ForceMode2D.Impulse);
    }

    public override void MoveRight()
    {
        this.actionText.text = "오른쪽 이동";
        this.GetRigid().AddForce(Vector2.right * this.moveSpeed, ForceMode2D.Impulse);
    }

    public override void Jump()
    {
        this.actionText.text = "점프";
        this.GetRigid().AddForce(Vector2.up * this.jumpSpeed, ForceMode2D.Impulse);
    }

    public override void Attack()
    {
        this.actionText.text = "공격!";
    }

    public override void PowerAttack()
    {
        this.actionText.text = "특수 공격!";
    }
}


// 파란팀 플레이어
public class BluePlayer : Actor
{
    private Color originColor = Color.blue;

    public override void Idle()
    {
        this.nameText.text = "Blue";
        this.actionText.text = "대기";
        this.spriteRenderer.color = this.originColor;
    }

    public override void MoveLeft()
    {
        this.actionText.text = "왼쪽 이동";
        this.GetRigid().AddForce(Vector2.left * this.moveSpeed, ForceMode2D.Impulse);
    }

    public override void MoveRight()
    {
        this.actionText.text = "오른쪽 이동";
        this.GetRigid().AddForce(Vector2.right * this.moveSpeed, ForceMode2D.Impulse);
    }

    public override void Jump()
    {
        this.actionText.text = "점프";
        this.GetRigid().AddForce(Vector2.up * this.jumpSpeed, ForceMode2D.Impulse);
    }

    public override void Attack()
    {
        this.actionText.text = "공격!";
    }

    public override void PowerAttack()
    {
        this.actionText.text = "특수 공격!";
    }
}
이렇게 구현하면 같은 요소(바뀌지 않는 요소)는 수퍼클래스 Actor에서 관리하며,
다른 요소(변화할 수 있는 요소)는 서브클래스에서 구현하여 사용할 수 있는 형태가 됩니다.
알게모르게 자연스럽게 사용해왔던 구조를 '템플릿 메소드 패턴'이라는 정의로 다시 한번 정리하는 느낌으로 배우는 시간이었습니다.
살짝 템플릿 메소드를 사용하기엔 아쉬운 파트에 넣은것 아닌가 싶지만 응용해서 게임을 구현하실때 다른 파트에서 좋게 사용될 것 같습니다.
다양하게 상속받아서 한번에 갱신해야하는 UI관리쪽이 좀더 어울리지 않았을까하는 생각이 듭니다.
지난주에 완료했어야했던 글이지만 한주가 늦었습니다. 좀더 성실하게 살겠습니다 허허
'게임 개발 > 디자인 패턴' 카테고리의 다른 글
| [디자인패턴] 12. 유니티에서 컴포지트 패턴 feat.이터레이터 패턴 (0) | 2021.12.25 |
|---|---|
| [디자인 패턴] 11. 유니티에서 이터레이터 패턴 (0) | 2021.11.09 |
| [디자인패턴] 9. 유니티에서의 어댑터 패턴 퍼사드 패턴 (2) | 2021.09.30 |
| [디자인패턴] 8. 유니티에서의 커맨드 패턴 (0) | 2021.09.23 |
| [디자인패턴] 7. 유니티에서 데코레이터 패턴 (0) | 2021.08.22 |